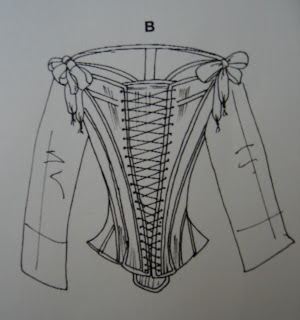
So I have started work on the Reconstructing History V&A Stays patter as promised. View B, shown above. The front opening Stays with Stomacher. I followed the instructions given on the pattern. Just take a moment to read this bit yourself ....

It all seemed so simple, the pattern pieces are easy to trace. There are only four of them. I had a nagging doubt about cutting the front on the fold - it has laces ... where does the fold fit in??? The instructions didn't explain. I trusted the instructions because sometimes things become apparent as you work ..

I cut an outer set and a lining set - no interlining as this is only a 'toile'. I marked all the pieces appropriately, and sewed the back to the sides as per the instrutions. So far so good ...
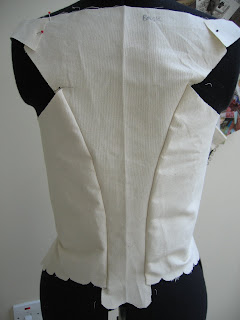
Then I moved on to the front .. The instructions said sew the front to the sides (in same manner as back) ... hmmm... Then they said when that is done, you can try thing thing on and that "if the stays are too tight, let the seams out"
Houston we have a problem!
Actually Houston, we have several problems!
1) exactly how much of the half centimetre seam allowance is available for letting out??
2) actually it's all sewn up .. how do you get into the thing??
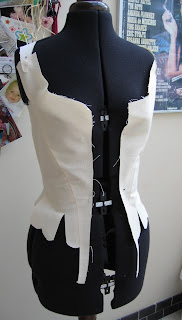
But before even considering those two points .. isn't there a bit missing???? I know it's supposed to be pulled in tight ... but this is a gap too far!


And even with some improvisation ... it still didn't look like the pattern picture up top. Here, you can see that I have sewed the sides to the front, and cut up the middle to form an opening. This gap is about right - you've got to allow for the body's 'squidge' factor.
BUT IT STILL DOESN'T LOOK ANYTHING LIKE THE PICTURE!
There are no more pattern peices, and the instructions were absolutely no help at all ... they say that once the front is sewn on, you can lace in a particular fashion ... Lace what?? Lace WHERE? It doesn't mention eyelets, let alone where to put them.
And another thing, the instructions don't actually tell you how to cut the pattern peices bearing in mind there are 2 versions of the stays ... ie: how does one deal with those flappy bits on the bottom?
When I cut into the flappy bits, the corset lay around the body better. But then what to do? View B, doesn't appear to have flappy bits. More improvisation required. But not yet.

I got so frustrated, reading, re-reading and reading again ... looking for missing pages which don't appear to exist, then checking that I had indeed cut all the pattern pieces. So I wrote to the company where I got the pattern from (looking at the pattern company website was even more useless than looking at the pattern). They are very nice and replied straight away. They said:
"You are not the first to be confused by this pattern ;-) The centre front piece cut on the fold is a seperate stomacher and need to be boned and finished as an entirely seperate entity followng instructions on page 4. The sides of the stays are finished then eyeletted and laced and the stomacher is popped in behind before the laces are tightened"
OK .. but there are NO SUCH INSTRUCTIONS on page 4!!!!!!! Grrr... "confused" is such an understatement that it is floating about somewhere near the 7th circle of hell!
Luckily (breathing deeply) I have my 'bible', with extremely appropriate title (in this case)

Now I see the problem ... In the chapter which covers 17/18th c stays, the patterns look like this:

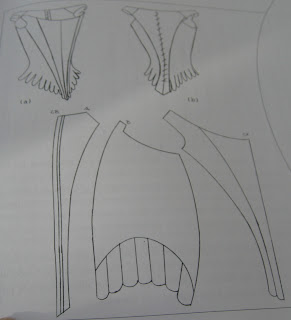
Can you see the missing link? There IS a peice missing!!!
And this is what the diagrams on the pattern instructions SHOULD look more like ...

A separate stomacher which can be joined into the stays with little tabs or eyelets so that the thing doesn't ping out and hit you on the chin when you least expect it!
So dear readers ... I will finish these Stays. I will have to improvise with what I have now that I have started, and I will be able to do it. BUT I do not recommend for one minute that you ever try this pattern for yourself!! At over £10 it's an expensive mistake to make!
Edit from the future: This incident is what prompted me to start Sew Curvy Corsetry! (3/12/14)


